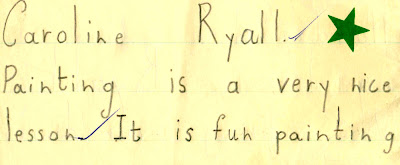
I'm going to kill two birds with one stone in this post. First off is this week's word - Lesson. Which was your favourite lesson at school? I didn't much enjoy the maths and science side, nor were sports my thing - I'm an arty gal and always have been judging by the above which I found yesterday in one of my first school exercise books - I was around six years old when I wrote that - note the star! Unfortunately, there are no paintings from that time but there are lots of little crayoned pictures that I made to illustrate my news in primary school.
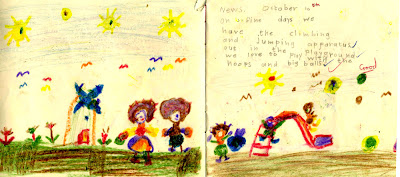
Take a look at the left hand pic! A Dutch girl and boy, windmill and tulips!! Who was to know then that I'd marry a Dutchman!!
See? Told you I was no good at sports!! Making pictures with wax crayons was definitely much more fun! These days I use mostly watercolour, coloured pencils and inks, but I've have recently bought some inexpensive oil pastels and started experimenting with these grown ups' wax crayons! I am used to achieving detail with fine points so these stubby little pastels are quite a challenge and have been ideal for' loosening up 'a little!
Today, I completed a picture with these waxy oil pastels for one of the travelling art books. This one is for Mim's book - her theme is Women around the World, so I decided to do an international crowd of girls and popped a few birds in there for good measure. Whilst I was at it I thought it might be fun to turn this into a weekword 'lesson' , so I took a few photos of the process so that I could let you see how I created this picture in oil pastels using the sgraffito technique. I quite like the end result of this process as it looks a little like a wood block print. Basically you create a design using oil pastels which is then covered with a layer of another colour and etched into. It's very exciting to reveal the underlying colours when you scrape into the top layer. I don't have a lot of patience, so am always eager to see the vibrant colours emerging with each scrape of the knife, so those of you with more patience will probably be able to plan and achieve much more detail with your scraping and scratching!
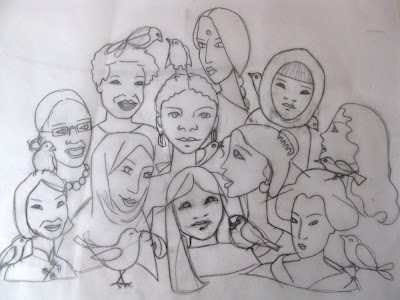
First I drew and then traced my design onto heavy cartridge paper - it's important to choose a reasonably heavy weight paper for this process as you will be scratching into it with a sharp implement to create your picture.
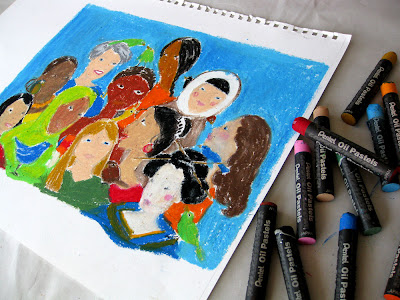 Next, I added small details likes eyes, mouths and beaks with coloured pencil as I knew I wouldn't be able to do that with the chunky sticks of oil pastel. I then blocked in the main colours of the design. You need to use a thick layer of colour, worked well into the paper as you have to scratch into this later.
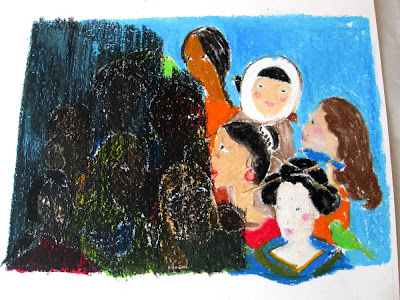
Now you really have to be brave and rub black oil pastel all over your design!! Not too thick, just enough to cover. This shows the picture half covered - at this stage you will be having serious doubts!!
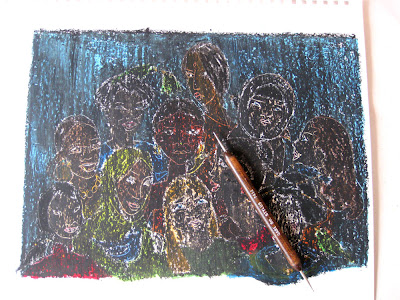
Here's the whole picture covered in black oil pastel! If you've not completely lost your nerve by now you need to retrieve the lines of your original design. Not so easy!! To help, I taped my tracing (lining up registration marks I'd made earlier) and traced over as accurately as I was able again with a stylus.
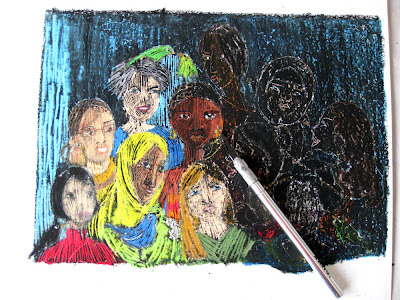 Here I am using a scalpel to gently scrape away the black pastel to reveal the design below. You can use any sharp implement at this stage - needle, pen nib, nail file, skewer, whatever! As you work do remember to clear the scrapings from your scalpel and surrounding areas frequently!!! Cover your working hand with a piece of scrap paper to protect the image - things smudge so easily!! Believe me, it is also pretty easy to overdo this scraping stage and end up with a grey mess. Should this happen, take heart, for fortunately, all is not lost! It is possible (with care) to retrieve overworked areas. Remove as much of the pastel as you can without destroying the surface (also very easily done and hence the need for a sturdy substrate!!) and paint over with a layer of gesso. Reapply your pastel base, cover again with black and try again!! If you obliterate an eye or beak try repainting with acrylic paint.
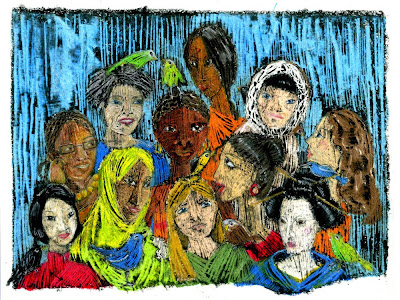
The final piece.
I liked the precision of my original design but am quite pleased with how my sgraffito oil pastel picture has turned out.
This week's word was chosen by Alexandra Hedberg. She has a list of all the other participants so do pop in to her blog to get more lessons!I liked the precision of my original design but am quite pleased with how my sgraffito oil pastel picture has turned out.
Have a good weekend!


Mim is going to go crazy for it.
ReplyDeleteFantastic.
Love your little girl drawings, talent galore even then.
xoxo
One of those magical moments I remember in kindergarten .... scraping away the black crayon to reveal the rainbow of colours inderneath. Your sgraffito picture turned out beautifully.
ReplyDeleteOh yes, Mim will love this. I am so glad I get to see it in person too. It is quite the operation.
ReplyDeleteI'm so glad you took us through the process!
ReplyDeleteI adored seeing your childhood drawing and writing. How dear!
I pondered over this for the longest time...
ReplyDeleteI love love love that you have work books from your childhood still. What teasures they are, and how funny about the Dutch kids and your marrying a Dutchman! What kind of pre knowing is that?
And your Mim's page is magnificent. Maybe I commented on it on the other blog. It is so well done, executed. And do so appreciate your teaching us your process. Wow.
I remember doing that with crayola crayons as a child-OHHHHH, I loved the smell of them!
ReplyDeletei've done the oil pastels first, then covered it with black, then scratched, but never over an already drawn image, (i have always created the image afterwards by scratching through the oil pastels.)
ReplyDeleteMy favourite lesson at school was art too, then English Literature, then PE but specifically badminton and trampolining!
ReplyDeleteI love your picture! I have not used that technique for years-so long in fact I had forgotten it-but now I want to get the oil pastels out. Thanks for the lesson!
I love learning about the process! Thank you so much for all the work you put into that. The finished piece is fantastic! I can't wait to see it. I, too, remember doing something like this in elementary school, but your is far from elementary.
ReplyDeletethamks for that lesson. I feel an urge to try but still it seems a bit scary!
ReplyDeleteUnfortunately I still draw like a five year old!! Your picture is amazing....
ReplyDeleteLove the childhood notebooks. Wonderful to have and reflect on. The oil pastel drawing step by step is wonderful too. As Soulbrush says, I've done similar but not with a drawing underneath. Justmaking the drawing in the scraping steps. This turned out beautifully. I too love that sort of woodcut effect. And thanks for the tip for help if we mess up.
ReplyDeletewhat a sweet little book! :)
ReplyDeleteI love that you still have that page - and with a star and everything!
ReplyDeleteLovely drawing with the scraping. Made me think of a woodcut
this is amazing Carolin! really thanks for sharing your knowledges ;-)
ReplyDeleteonly wish to have time to try them!
The result is magnific!
Btw, I love very much the poppi in the new "welcoming" of your blog :-)
Regards from ..Berlin ( no more Spain, at the moment :.)
Teacher, teacher, I must commend you on an excellent lesson! This looks like a lot of fun, and the results are...wow! You say you are new to oil pastels? GAH! Is there nothing you cannot do?
ReplyDeleteYour childhood journal is beyond priceless! Your penmanship and coloring is so much better than any six year old's I've ever seen! I am not surprised. :)
....very, very cool.....I LOVE the process you showed on creating your art. It is amazing. Thank you for posting that. I wondered how you achieved some of your looks. Then...back to the beginning. How sweet.....your heart must have just melted when you saw your little journal from so many years ago. Just lovely....
ReplyDeleteWow, this is amazing Caroline. Loved seeing your childhood drawings too - very colourful.
ReplyDeleteIt was fun seeing this proces and your pages from your youth. How precious that you still have them!
ReplyDeleteYour page for Mim is awesome!
I have tried this long ago too but a bit different.
I love the original sketch! Wo what a super drawing!
Groetjes!
What an amazing post....from little girl to big girl...your art is enchanting...Loved every bit of this! :)
ReplyDeletecreating misericordia - will chose next weekword (se my blog for link). if she doesn't decline that is!
ReplyDeleteWow, that's amazing, Caroline (your oil pastel illustration)...it turned out wonderfully. I enjoyed seeing the linework too. You have great nerve to blacken your art like that..and it turned out so well! The drawings you did when you were little are so sweet! Thanks so much for your visit! I appreciate it, Caroline! Have a great week ahead.
ReplyDeleteOkay, you are having too much fun! That ought to be illegal! Hahahah!
ReplyDeleteOh caroline look at your journal. It is priceless. It is a treasure!
How fun to see your young work. I love oil pastels for getting me to free up, and have the same frustration with details. The sgraffito is quite a process that does take some bravery.
ReplyDeleteoooohh aaahhhhh that is fascinating. I might give it a go! What an amazing effort on your behalf. I think it is very successful. I am really loving to look at it! ps I married a dutchman too!
ReplyDeleteCaroline! I can't say what's more wonderful--your little girl journal or this lesson. I remember the smell of the crayons too,
ReplyDeleteI love this. I love your spirit. And always I love your watrcolors. Our friend mom will adore this.
Ps email me when you have a chance--I have some info
xo
kj
Wow, I am in awe of your courage and ability Caroline. I think I would have baulked at the covering with the black crayon. The finished image is really great and I agree, it does resemble a woodcut.
ReplyDeleteLovely to see your old school books too. I haven't any pictures I made but I do remember I used to draw ladies with tiny waists, huge dresses and their arms stretched out sideways.
Hi Caroline, great work!
ReplyDeleteWow, Caroline, the sgraffito technique is not for the faint of heart! It does look beautiful! I love those dark lines, very much like woodblock...
ReplyDeleteMy favorite subjects in school were art and languages. I wish I had been good at math, though, but that simply did not happen! :-)
okay, caroline, i have a problem. my new iphone keeps sneaking in 'mom' for 'mim'. it is trying to push me around, putting words in my blogmouth.
ReplyDeletei meant to say MIM! not MOM!
thank you.
xo
I love your finished piece and I want to try this technique myself. Thanks for explaining your process.
ReplyDeleteThis is so cool! I have never seen this done before with pastels. When I was a child we played with crayolas and this technique. Your picture is fabulous. Thank you for sharing the "how to."
ReplyDelete